From the blog
How-Tos, Deep-Dives, Brain-Dumps, and More
TESTING, TRAVIS CI, BLOG
Travis CI - Running Tests on MySQL 8.0.X on Ubuntu Xenial
Who is this article for?
Anyone looking for how to install MySQL 8.0.X on Travis CI with Ubuntu Xenial.
This article would be very brief and should not take more than 1 min to upgrade MySQL 5.7.X to MySQL 8.0.X.
Before You Begin
If you are using Docker this particular article is not for you, I will be doing another post which will show how you use different containers inside Docker with Travis CI.
I am going to assume we are directly upgrading the MySQL and running the tests.
Step 1 - Upgrade to MySQL 8.0.X
wget https://repo.mysql.com//mysql-apt-config_0.8.10-1_all.deb
sudo dpkg -i mysql-apt-config_0.8.10-1_all.deb
sudo apt-get update -q
sudo apt-get install -q -y --allow-unauthenticated -o Dpkg::Options::=--force-confnew mysql-server
Step 2 - Restart the SQL Server
sudo systemctl restart mysqlStep 3 - Complete the upgrade
sudo mysql_upgradeStep 4 - Verify the installed version
mysql --versionSample Travis yml file
dist: xenial

sudo: true

language: php

services:
  - mysql

php:
  - "7.2"

before_script:
  - wget https://repo.mysql.com//mysql-apt-config_0.8.10-1_all.deb
  - sudo dpkg -i mysql-apt-config_0.8.10-1_all.deb
  - sudo apt-get update -q
  - sudo apt-get install -q -y --allow-unauthenticated -o Dpkg::Options::=--force-confnew mysql-server
  - sudo systemctl restart mysql
  - sudo mysql_upgrade
  - mysql --version

script:
  - ./vendor/bin/phpunit
Conclusion
Upgrading MySQL using this technique works as expected if you are not using Docker.
It is a good practice to test your code before upgrading the SQL version on your production instance.
I did posted the same question in the travis community - https://travis-ci.community/t/how-can-i-use-mysql-8-0-on-xenial-distribution-currently-it-says-5-7/2728?u=akki-io

MYSQL, CTE, BLOG
MySQL - Adjacency List Model For Hierarchical Data Using CTE
Who is this article for?
Anyone looking for how Manage Hierarchical Data in MySQL with Adjacency List Model using CTE (Common Table Expressions).
In this article, I’m going to walk through on how to retrieve, insert and update hierarchical data.
Before You Begin
If you don't know what CTE's are, I would highly recommend reading about it. Since v8.x, MySQL has added support for CTE which it was missing for quite some time.
Before v8.X, it was challenging to retrieve data from the Adjacency List Model as outlined in the Mike Hillyer article.
Just to give you a brief overview of how Recursive CTE works, let's check the pseudo code below.
CTE DEFINITION (
  ANCHOR (SQL STATEMENT 1)
  UNION ALL
  RECURSIVE MEMBER (SQL STATEMENT 2)
)
SELECT * FROM CTE- The first line is the CTE definition, for a recursive CTE it looks something like
WITH RECURSIVE cteName (columns) AS ( - Then the "Anchor" part is executed and generates a result, let's assume it generated result "R1",
- After the anchor, "Recursive Member" gets executed using "R1" as input, let's says it generated result set "R2".
- Again, "Recursive Member" gets executed using "R2" as input, this goes on until "Recursive Member" output is null.
- Finally, "Union All" is applied to all output, and that becomes our final result set.
Hopefully, that is not too confusing, if so, google and read more about CTE's.
Let go over some of the common terms with adjacency list.
- Root Node - This is the primary node, it is usually the node that does not have a parent but is a parent for one or more entities.
- Leaf nodes - These are the node that does not have any children.
- Non-Leaf Node - These are the node that has one or more children.
- Descendants - All children, grandchildren, etc. of a node.
- Ancestors - All parents, grandparent, etc. of a node.
You must be asking, how this article is different from the one posted here. Honestly, there is not much of a difference, but in this article, we'll cover some extra set of queries and use multiple recursive CTE for some queries. This makes it a little more advanced when compared to mysqltutorial.org article.
For this article, I will be using the below graph as an adjacency list.
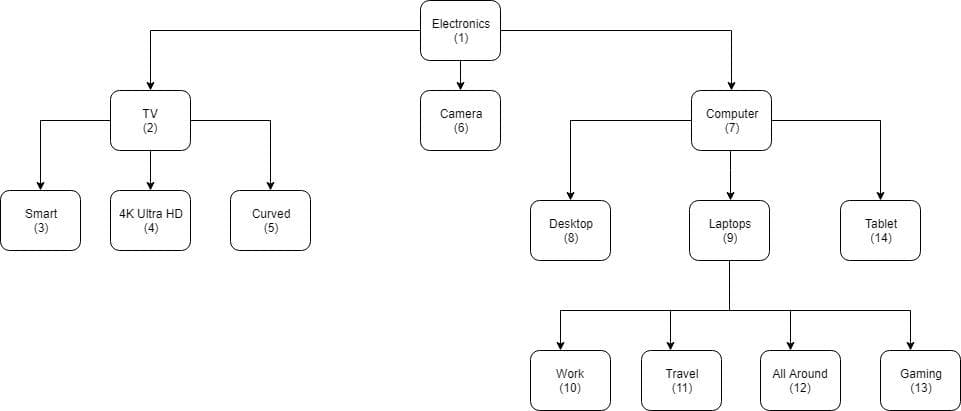
Ok, now let's jump into creating a table and see how we can do inserts, updates, and selects.
Step 1 - Create a table.
CREATE TABLE category (
  id int(10) UNSIGNED NOT NULL AUTO_INCREMENT,
  name varchar(255) NOT NULL,
  parent_id int(10) UNSIGNED DEFAULT NULL,
  is_active int(1) UNSIGNED DEFAULT 1,
  PRIMARY KEY (id),
  FOREIGN KEY (parent_id) REFERENCES category (id)
    ON DELETE CASCADE ON UPDATE CASCADE
);
As you can see I have added one additional column (is_active), we will be using this column later on in the select queries.
Step 2 - Insert dummy records.
INSERT INTO category (name, parent_id) VALUES ("Electronics", null);
INSERT INTO category (name, parent_id) VALUES ("TV", 1);
INSERT INTO category (name, parent_id) VALUES ("Smart", 2);
INSERT INTO category (name, parent_id) VALUES ("4K Ultra HD", 2);
INSERT INTO category (name, parent_id) VALUES ("Curved", 2);
INSERT INTO category (name, parent_id) VALUES ("Camera", 1);
INSERT INTO category (name, parent_id) VALUES ("Computer", 1);
INSERT INTO category (name, parent_id) VALUES ("Desktop", 7);
INSERT INTO category (name, parent_id) VALUES ("Laptops", 7);
INSERT INTO category (name, parent_id) VALUES ("Work", 9);
INSERT INTO category (name, parent_id) VALUES ("Travel", 9);
INSERT INTO category (name, parent_id) VALUES ("All Around", 9);
INSERT INTO category (name, parent_id) VALUES ("Gaming", 9);
INSERT INTO category (name, parent_id) VALUES ("Tablet", 7);
Step 3 - Selecting Data via CTE
Finding the root node
SELECT
  *
FROM
  category
WHERE
  parent_id IS NULL;
Finding the immediate children of a node
You can first retrieve the id of the root node and then supply it here, or you can do a sub where clause.
SELECT
  *
FROM
  category
WHERE
  parent_id = (SELECT id FROM category WHERE parent_id IS NULL);
Finding the leaf nodes
SELECT
  c1.*
FROM
  category c1
    LEFT JOIN category c2 ON c2.parent_id = c1.id
WHERE
  c2.id IS NULL;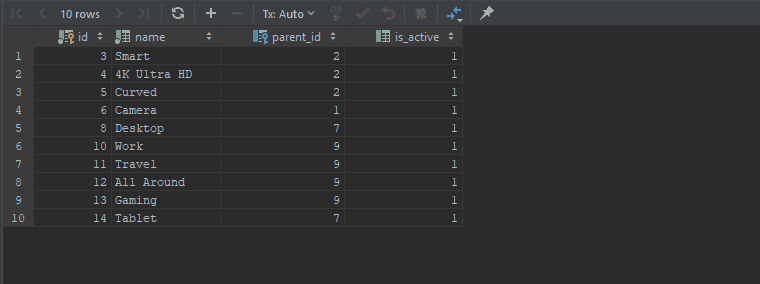
Retrieving the whole tree
WITH RECURSIVE shoppingCategories AS
(
  SELECT id, name, parent_id, 1 AS depth, name AS path
    FROM category
    WHERE parent_id IS NULL
  UNION ALL
  SELECT c.id, c.name, c.parent_id, sc.depth + 1, CONCAT(sc.path, ' > ', c.name)
    FROM shoppingCategories AS sc
      JOIN category AS c ON sc.id = c.parent_id
)
SELECT * FROM shoppingCategories;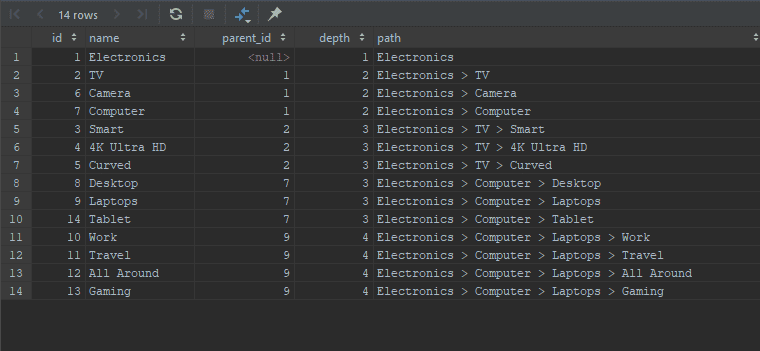
Retrieving the subtree.
We will now retrieve the Laptop subtree
WITH RECURSIVE shoppingCategories AS
(
  SELECT id, name, parent_id, 1 AS depth, name AS path
    FROM category
    WHERE id = 9
  UNION ALL
  SELECT c.id, c.name, c.parent_id, sc.depth + 1, CONCAT(sc.path, ' > ', c.name)
    FROM shoppingCategories AS sc
      JOIN category AS c ON sc.id = c.parent_id
)
SELECT * FROM shoppingCategories;
Retrieving only active categories
Let's make the TV category as inactive, remember we added the flag called is_active.
UPDATE category SET is_active = 0 WHERE id = 2;Ok, Now we'll retrieve the complete tree again, but this time we will exclude any nodes that are inactive and exclude their descendants.
WITH RECURSIVE shoppingCategories AS
(
  SELECT id, name, parent_id, 1 AS depth, name AS path
    FROM category
    WHERE parent_id IS NULL
  UNION ALL
  SELECT c.id, c.name, c.parent_id, sc.depth + 1, CONCAT(sc.path, ' > ', c.name)
    FROM shoppingCategories AS sc
      JOIN category AS c ON sc.id = c.parent_id
    WHERE c.is_active = 1
)
SELECT * FROM shoppingCategories;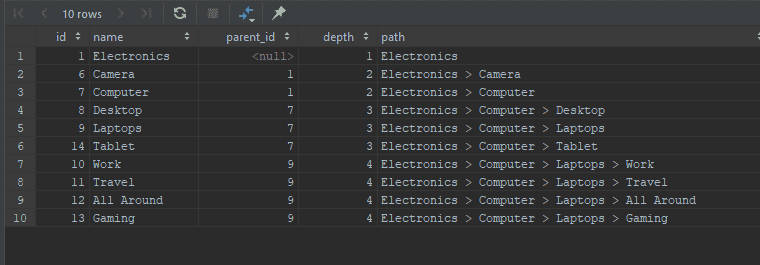
Retrieving the descendants and ancestors line
Now, let's say you are on the Laptop category and want to retrieve all the descendants and ancestors line. There are multiple ways to do that, I will go over the one that works best for me.
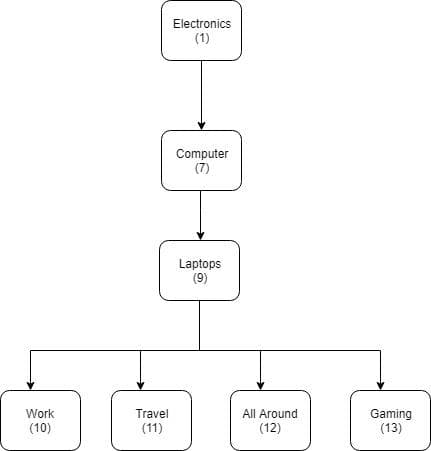
Retrieve all the descendants with positive depth and ancestors as negative depth.
WITH RECURSIVE
  ancestorCategories  AS
  (
    SELECT id, name, parent_id, 0 AS depth
      FROM category
      WHERE id = 9
    UNION ALL
    SELECT c.id, c.name, c.parent_id, ac.depth - 1
      FROM ancestorCategories AS ac
        JOIN category AS c ON ac.parent_id = c.id
  ),
  descendantCategories  AS
  (
    SELECT id, name, parent_id, 0 AS depth
      FROM category
      WHERE id = 9
    UNION ALL
    SELECT c.id, c.name, c.parent_id, dc.depth + 1
      FROM descendantCategories AS dc
        JOIN category AS c ON dc.id= c.parent_id
  )
SELECT * FROM ancestorCategories
UNION
SELECT * FROM descendantCategories
ORDER BY depth;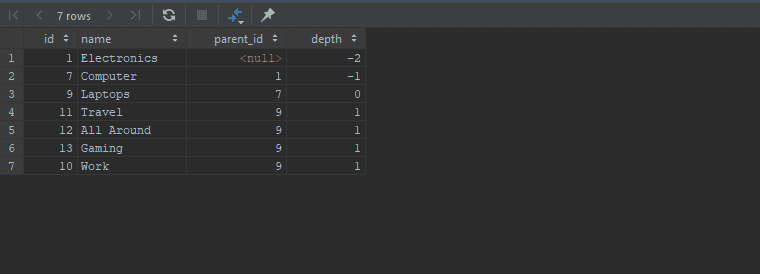
Tree Expansion Query
Let's say you are building an expanding tree. When you click on Electronics it shows you all Level 1 children, i.e. TV, Camera and Computer, then if you select Computer it will show all Level 1 of Ancestor, i.e., Electronics plus Level 1 of Computer.
It will look something like this.

Here is how you do that
SET @catID = 9;
WITH RECURSIVE
  ancestorCategories  AS
  (
    SELECT id, name, parent_id, 1 AS depth
      FROM category
      WHERE id = @catID
    UNION ALL
    SELECT c.id, c.name, c.parent_id, ac.depth - 1
      FROM ancestorCategories AS ac
        JOIN category AS c ON ac.parent_id = c.id
  ),
  ancestorDeptOneCategories  AS
  (
    SELECT id, name, parent_id, 1 AS depth
      FROM category
      WHERE parent_id IS null
    UNION ALL
    SELECT c.id, c.name, c.parent_id, adoc.depth + 1
      FROM ancestorDeptOneCategories AS adoc
        JOIN ancestorCategories ac ON ac.id = adoc.id
        JOIN category AS c ON adoc.id = c.parent_id
  )
SELECT * FROM ancestorDeptOneCategories
ORDER BY depth;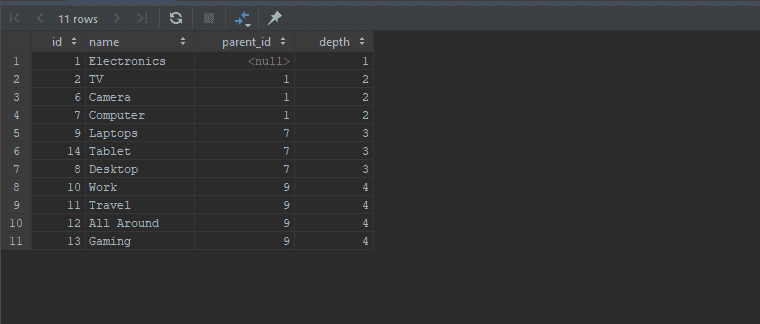
Here you can see we are passing the id as variable @catID, in the first CTE we are getting all the ancestors including self, and then in the second CTE ancestorDeptOneCategories we are getting all first level descendants of those ancestors.
Step 4 - Updating a parent.
This when you want to move a sub-tree. If we're going to move Laptopand all its descendants to a Camera we need to update the parent_id of Laptop record
UPDATE category SET parent_id = 6 where id = 9;If we only want to move Laptop to Camera and promote its descendants we first update the parent of Level 1 children of Laptop, then update parent of Laptop.
UPDATE category SET parent_id = 7 where parent_id = 9;
UPDATE category SET parent_id = 6 where id = 9;
Step 5 - Deleting a parent.
To delete a node and its descendants, just remove the node itself, all the descendants will be deleted automatically by the DELETE CASCADE of the foreign key constraint.
So if we want to remove Laptop then -
DELETE FROM category WHERE id = 9;Delete a node and promote it, descendants, we first promote the descendants and then remove the node.
UPDATE category SET parent_id=7 where parent_id=9;
    DELETE FROM category WHERE id = 9;
Conclusion
In my experience when you have a hierarchical relation that has nodes inserted or moved regularly, nested sets causes a lot of Database transaction locks and tends to be slow. We had faced issues when our hierarchy relationship was broken. If you implement nested set using mike hillyer methods, you will not be able to add unique constraints which mean the data can be corrupted quite easily.
From the StackOverflow
The Nested Set Model is nowadays not commonly used in databases, since it is more complex than the Adjacency List Model, given the fact that it requires managing two “pointers” instead of a single one. Actually, the Nested Set Model has been introduced in databases when it was complex or impossible to do recursive queries that traversed a hierarchy.
On the other hand, adjacency set offers much faster select, inserts and update. I found it to be much reliable and especially with CTE introduction, I don't see why we need to use a nested set.
If you want to run more performance test on adjacency set with a much larger database, I would recommend downloading data from ITIS.gov they have around half a million records saved in adjacency set.
In my future article, I will be covering how to record a particular hierarchy before any insert or update to the tree. This is useful if you want to show historical hierarchy at a given point in time.
References

AUDIT, LARAVEL, PHP, QUEUE, BLOG
Laravel Auditing - Queue Auditable Models
Who is this article for?
Anyone looking for how Queue Laravel Auditing Package.
In this article, I’m going to walk through, how to Queue the Laravel Auditing Package. We will be utilizing the event listeners and job to achieve this.
Before You Begin
In this article, we will be using the latest release (v8.x) at the time of this article.
This package supported queuing the request in older versions but was later removed.
As per the PR, it states that queuing was removed because the User relation was lost since the session is used to resolve the current User performing the action and the queue doesn't have access to it. Another point mentioned was, since it was not used often by developers. Also, the overhead is very minimal.
All the points stated above are kinda correct. So the question is Why to Queue it?
In my experience, working on a large enterprise application, it can add some overhead, especially if you go frequent updates. But again, if you use DB for queuing, it is the null and void situation.
Also, if you plan to use No-SQL like AWS DynamoDB for storing the log records, it can add some network latency. The request can fail if there are any exceptions.
I would suggest queuing the audit. We will be using 4 different types of queue priorities in our example. These are
- highPriority
- mediumPriority
- default
- lowPriority
These will be configured in your supervisor workers.conf. The steps below outline how to queue the audits. To do the basic installation follow the steps outlined in the package, I am going to assume we already have the package setup and working. Also, in this article, we are using database jobs for queuing.
Step 1 – Create an Audit Model.
<?php

namespace App\Models;

use OwenIt\Auditing\Audit as AuditTrait;
use OwenIt\Auditing\Contracts\Audit as AuditContract;
use Illuminate\Database\Eloquent\Model;

/**
 * @property mixed auditable_table
 * @property mixed auditable_type
 * @property int id
 */
class Audit extends Model implements AuditContract
{
    use AuditTrait;

    /**
     * Specify the connection, since this implements multitenant solution
     * Called via constructor to faciliate testing
     *
     * @param array $attributes
     */
    public function __construct($attributes = [])
    {
        parent::__construct($attributes);
        $this->setConnection(config('database.audit_connection'));
    }

    /**
     * The attributes that should be cast to native types.
     *
     * @var array
     */
    protected $casts = [
        'old_values' => 'json',
        'new_values' => 'json',
    ];

    /**
     * The attributes that should be mutated to dates.
     *
     * @var array
     */
    protected $dates = [
        'created_at',
        'updated_at',
        'deleted_at',
    ];

    /**
     * The attributes that are mass assignable.
     *
     * @var array
     */
    protected $fillable = [
        'id',
        'auditable_id',
        'auditable_type',
        'event',
        'ip_address',
        'new_values',
        'old_values',
        'tags',
        'url',
        'user_agent',
        'user_id',
        'user_type',
        'updated_at',
    ];
}
In the above code, I am using a different database for storing audits, the connection is set in the __construct method. If you want to learn more about this click here.
Step 2 - Create a Job.
<?php

namespace App\Jobs;

use App\Models\Audits;
use Exception;
use Illuminate\Bus\Queueable;
use Illuminate\Queue\SerializesModels;
use Illuminate\Queue\InteractsWithQueue;
use Illuminate\Contracts\Queue\ShouldQueue;
use Illuminate\Foundation\Bus\Dispatchable;
use Illuminate\Support\Facades\Log;

class SaveAuditToDBJob implements ShouldQueue
{
    use Dispatchable, InteractsWithQueue, SerializesModels;
    protected $data;

    /**
     * The name of the queue the job should be sent to.
     *
     * @var string
     */
    public $queue = 'lowPriority';

    /**
     * Create a new job instance.
     *
     * @param array $data
     */
    public function __construct(array $data)
    {
        $this->data = $data;
    }

    /**
     * Handle the event.
     *
     * @return void
     */
    public function handle()
    {
        Audit::create($this->data);
    }

    /**
     * Handle a job failure.
     *
     * @param Exception $exception
     * @return void
     */
    public function failed(Exception $exception)
    {
        Log::error('UNABLE TO SAVE AUDIT RECORD FROM JOB.', [
            'data' => $this->data,
            'errors' => json_encode($exception->getMessage()),
        ]);
    }
}
public $queue = 'lowPriority';Here we have set which queue this job should run. We will use this later in this article once we are configuring supervisor configuration. This job expects an array to be passed as an argument and the uses the Laravel create() method to store the values. This function will be able to do a bulk insert as we have configured $fillable property in the model.
Step 3 – Create a listener.
We will be using the Auditing event from the package, this event gets fired before the audits are saved. For now, let's configure the listener.
<?php

namespace App\Listeners\Audit;

use App\Jobs\SaveAuditToDBJob;
use function config;
use OwenIt\Auditing\Events\Auditing;

class SaveAuditToDBListener
{
    /**
     * Handle the event.
     *
     * @param Auditing $event
     * @return bool
     * @throws \OwenIt\Auditing\Exceptions\AuditingException
     */
    public function handle(Auditing $event)
    {
        SaveAuditToDBJob::dispatch($event->model->toAudit());
        return false;
    }
}
The boolean return false is significant here so do not forget to return it. By returning false from the event listener handle() method, it cancels the Audit.
Step 4 - Update Event Service Provider
<?php

namespace App\Providers;

use App\Listeners\Audit\SaveAuditToDBListener;
use Illuminate\Foundation\Support\Providers\EventServiceProvider as ServiceProvider;
use OwenIt\Auditing\Events\Auditing;

class EventServiceProvider extends ServiceProvider
{
    /**
     * The event listener mappings for the application.
     *
     * @var array
     */
    protected $listen = [
        Auditing::class => [
            SaveAuditToDBListener::class
        ],
    ];

    /**
     * Register any events for your application.
     *
     * @return void
     */
    public function boot()
    {
        parent::boot();
    }
}
Here you can see we are mapping our Events and corresponding listeners. In our case, it is just one.
Step 5 - Update supervisor configuration.
Update the supervisor configuration, so that it can run the newly created queue.
Default
command=php repo_path/artisan queue:work --sleep=3 --tries=3To
command=php repo_path/artisan queue:work --queue=highPriority,mediumPriority,default,lowPriority --sleep=3 --tries=3 The --sleep and --tries will depend on your settings. And voila, the Laravel Auditing package audits are now queued.
Conclusion
Using the technique will ensure that your User relation will be intact. I would only recommend queuing audits if you are building an extensive application and/or you are using a different database on a different host. In our scenario, we are using two different RDS. I would also queue the audits, if you are using a different type of database like NoSQL, MongoDB, DynamoDB, etc.
In one of my position, we did experiment with DynamoDB for storing audits, but we end up using a different RDS. DynamoDB did not cut the requirements for us, but it might in your case. Queuing or not queuing, using the same database or separate database or even different type of database really depends on individual requirements. You should although try to follow the YAGNI - KISS Principle.
References
LARAVEL, PHP, TESTING, BLOG
Laravel Dusk - How to test Stripe (Cashier)
Who is this article for?
Anyone looking for how to test stripe effectively with Laravel Dusk.
In this article, I’m going to walk through, how to effectively test Stripe with Laravel Dusk. We will use using Stripe Elements as our test case.
Before You Begin
Lets quickly review how Stripe Elements work and what are the challenges we need to address.
To use Stripe Elements, we first add CSS in the
and a JavaScript before</body>. Within the <body> we then add a <div> something like this
<div id="example-card" class="input"></div>The id of the div is reference within the JavaScript which load an iframe inside the above div. The rendered page code looks something like this -
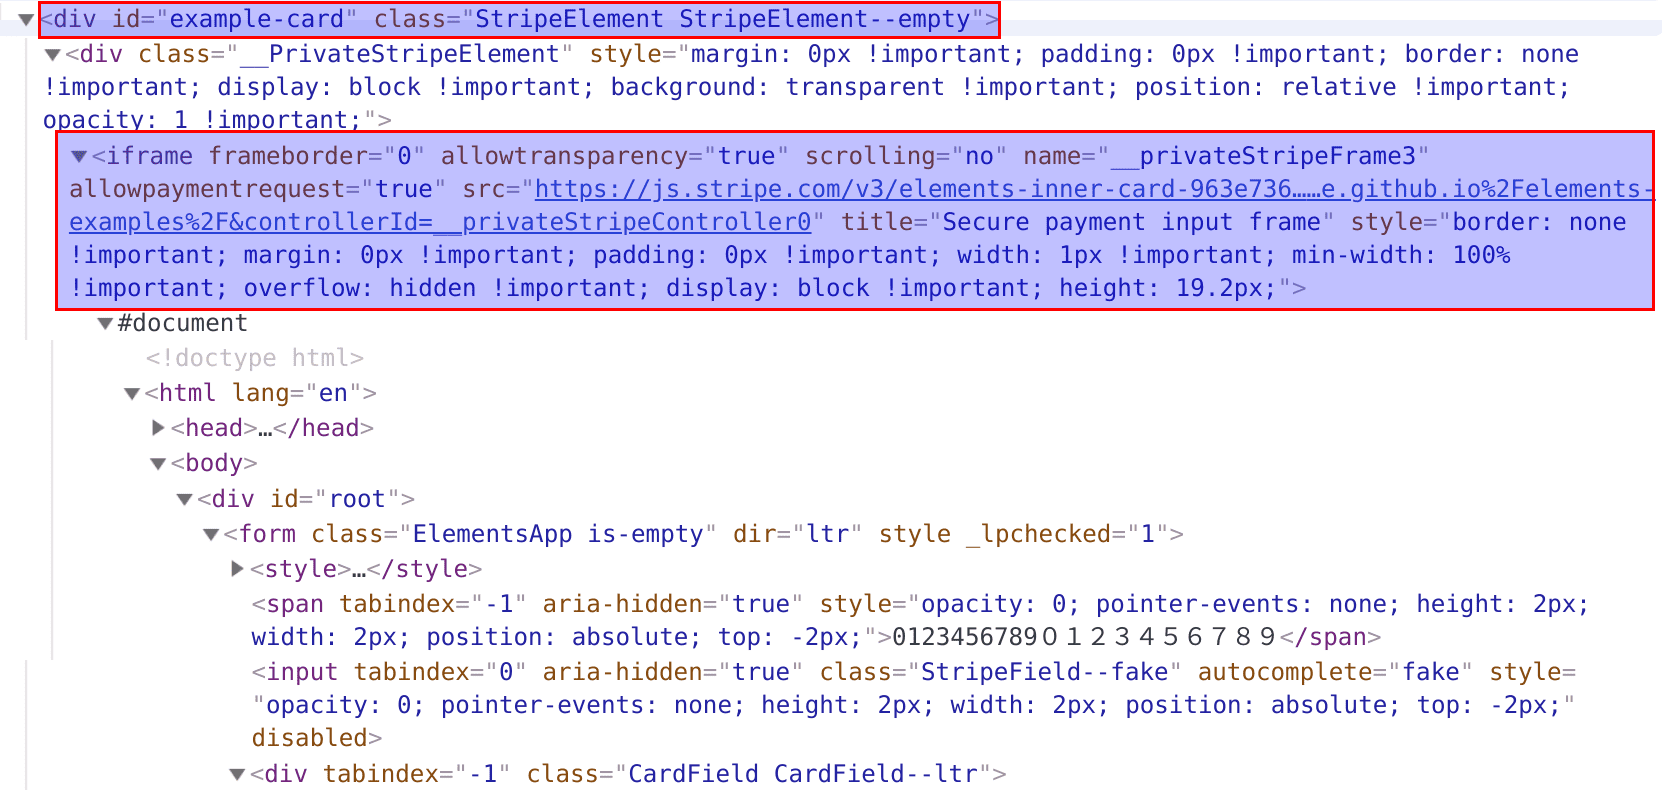
Alright, so we need to have dusk input values inside an iframe. We know that dusk is built on top of facebook php-webdrive and it can switch between frames and type in iframes.
$myFrame = $driver->findElement(WebDriverBy::id('my_frame'));
$driver->switchTo()->frame($myFrame);
Lets, give this a try. The first version of the test looks something like this.
<?php

namespace Tests\Browser\Components;

use Tests\DuskTestCase;

class StripeElementsTest extends DuskTestCase
{
    /**
     * Test for adding cc to stripe elements using dusk
     * @test
     * @throws \Throwable
     */
    public function stripe_element_add_card_test()
    {
        $this->browse(function ($browser) use ($this->user) {
            $browser->loginAs($this->user)
                ->visit(route('user.addCard'))
                ->type('cardholder-name', 'Jonny Doe')
                ->type('address-zip', '33613')
                // step below will ensure that the stripe lib is fully loaded
                ->waitFor('#example-card iframe');

            // Lets make the switch to iframe
            $browser->driver->switchTo()->frame('__privateStripeFrame3');

            // Enter values for cc number, expiration date and cvc
            // Making sure that the input box is loaded
            $browser->waitfor('input[name="cardnumber"]')
                ->type('cardnumber', '4242 4242 4242 4242')
                ->type('exp-date', '12 50')
                ->type('cvc', '123');

            // Switch back to the main frame
            $browser->driver->switchTo()->defaultContent();

            // Submit the form, from the main frame
            // This will be the submit button id in your case.
            $browser->click('#m--btn-card-submit');

            // Perform your others checks.............
        });
    }
}
Ok, this seems to be working. But there are a few things I don't like with this approach. Below we will address each point and refactor our test case.
Refactor 1
As you can see above, we are directly referencing the iframe name "__privateStripeFrame3". If Stripe changes the name of the iframe, our Dusk tests will stop working. So we need to use a relative path to get the iframe. Luckily, the $browser object has a way to execute Javascript from within the tests.
This can be used like
$browser->script($scripts); // $scripts can be an array.So, now rather than referencing iframe name "__privateStripeFrame3" we will use our main div id #example-card and try to locate the iframe within. After first refactoring, our code looks something this.
<?php

namespace Tests\Browser\Components;

use Tests\DuskTestCase;

class StripeElementsTest extends DuskTestCase
{
    /**
     * Test for adding cc to stripe elements using dusk
     * @test
     * @throws \Throwable
     */
    public function stripe_element_add_card_test()
    {
        $this->browse(function ($browser) use ($this->user) {
            $browser->loginAs($this->user)
                ->visit(route('user.addCard'))
                ->type('cardholder-name', 'Jonny Doe')
                ->type('address-zip', '33613')
                // step below will ensure that the stripe lib is fully loaded
                ->waitFor('#example-card iframe');

            // Lets make the switch to iframe, we are using our main example card div
            // and getting the child iframe name using javascript
            $browser->driver
                ->switchTo()
                ->frame($browser->script('return $("#example-card iframe").attr("name");')[0]);

            // Enter values for cc number, expiration date and cvc
            // Making sure that the input box is loaded
            $browser->waitfor('input[name="cardnumber"]')
                ->type('cardnumber', '4242 4242 4242 4242')
                ->type('exp-date', '12 50')
                ->type('cvc', '123');

            // Switch back to the main frame
            $browser->driver->switchTo()->defaultContent();

            // Submit the form, from the main frame
            // This will be the submit button id in your case.
            $browser->click('#m--btn-card-submit');

            // Perform your others checks.............
        });
    }
}
Refactor 2
Dusk tends to input values in the text box at lighting fast speed. Stripe Elements drop in is pretty Javascript heavy, this causes dusk to input the cc numbers incorrectly as Stripe JS tries to parse and validate cc numbers of every keystroke.
To avoid this, we are going to add pauses after every digit. We will be using the append() method for the same.
<?php

namespace Tests\Browser\Components;

use Tests\DuskTestCase;

class StripeElementsTest extends DuskTestCase
{
    /**
     * Test for adding cc to stripe elements using dusk
     * @test
     * @throws \Throwable
     */
    public function stripe_element_add_card_test()
    {
        $this->browse(function ($browser) use ($this->user) {
            $browser->loginAs($this->user)
                ->visit(route('user.addCard'))
                ->type('cardholder-name', 'Jonny Doe')
                ->type('address-zip', '33613')
                // step below will ensure that the stripe lib is fully loaded
                ->waitFor('#example-card iframe');

            // Lets make the switch to iframe, we are using our main example card div
            // and getting the child iframe name using javascript
            $browser->driver
                ->switchTo()
                ->frame($browser->script('return $("#example-card iframe").attr("name");')[0]);

            // Enter values for cc number, expiration date and cvc
            // Making sure that the input box is loaded
            $browser->waitfor('input[name="cardnumber"]');

            // Avoiding dusk super speed to input incorrect cc number.
            foreach (str_split('4242424242424242') as $char) {
                $browser->append('cardnumber', $char)->pause(100);
            }

            $browser->type('exp-date', '12 50')
                ->type('cvc', '123');

            // Switch back to the main frame
            $browser->driver->switchTo()->defaultContent();

            // Submit the form, from the main frame
            // This will be the submit button id in your case.
            $browser->click('#m--btn-card-submit');

            // Perform your others checks.............
        });
    }
}
Refactor 3
This is starting to look good and is working very smoothly. The only thing I would now like to refactor is to abstract out the switch to iframe and back. It currently looks like a lot of things are happening in this line.
$browser->driver
    ->switchTo()
    ->frame($browser->script('return $("#example-card iframe").attr("name");')[0]);
We will be using Dusk browser macros, using macros makes the code a little more readable.
Let's create a macro inside DuskServiceProvider.php.
<?php

namespace App\Providers;

use Illuminate\Support\ServiceProvider;
use Laravel\Dusk\Browser;

class DuskServiceProvider extends ServiceProvider
{
    /**
     * Bootstrap services.
     *
     * @return void
     */
    public function boot()
    {
        Browser::macro('switchToFrame', function ($frameNameOrDivId = null, $childOfDiv = false) {
            switch (true) {
                // If the frame is child of div, we will use script to get the frame name
                case $childOfDiv && $frameNameOrDivId:
                    $this->driver
                        ->switchTo()
                        ->frame($this->script("return $(\"#{$frameNameOrDivId} iframe\").attr(\"name\");")[0]);
                    break;
                // Not a child of Div and frame name is set
                case !$childOfDiv && $frameNameOrDivId:
                    $this->driver->switchTo()->frame($frameNameOrDivId);
                    break;
                // By Default switch back to main frame
                default:
                    $this->driver->switchTo()->defaultContent();
            }

            return $this;
        });
    }
    /**
     * Register services.
     *
     * @return void
     */
    public function register()
    {
    }
}<?php
namespace Tests\Browser\Components;
use Tests\DuskTestCase;
class StripeElementsTest extends DuskTestCase
{
/**
* Test for adding cc to stripe elements using dusk
* @test
* @throws \Throwable
*/
public function stripe_element_add_card_test()
{
$this->browse(function ($browser) use ($this->user) {
$browser->loginAs($this->user)
->visit(route('user.addCard'))
->type('cardholder-name', 'Jonny Doe')
->type('address-zip', '33613')
// step below will ensure that the stripe lib is fully loaded
->waitFor('#example-card iframe');
// Lets make the switch to iframe using the macro
$browser->switchToFrame($frameNameOrDivId = 'example-card', $childOfDiv = true);
// Enter values for cc number, expiration date and cvc
// Making sure that the input box is loaded
$browser->waitfor('input[name="cardnumber"]');
// Avoiding dusk super speed to input incorrect cc number.
foreach (str_split('4242424242424242') as $char) {
$browser->append('cardnumber', $char)->pause(100);
}
$browser->type('exp-date', '12 50')
->type('cvc', '123');
// Switch back to the main frame
$browser->switchToFrame();
// Submit the form, from the main frame
// This will be the submit button id in your case.
$browser->click('#m--btn-card-submit');
// Perform your others checks.............
});
}
}The last refactor is entirely optional.
Clean Up
In the medium article, the author is deleting the subscription from the user and then removing the customer from Stripe. I use SQLite disposable DB for Dusk tests and a totally unrelated stripe account. Since the dusk .env file is by default under source control, I don't use any keys which are in any shape or form related to my working environment. I do a regular cleanup of my test Stripe account depending on my test activities. Click here to find how to delete all test data from Stripe.
In the next articles, I will talk about how to test a multi-database Laravel project using SQLite in-memory DB for all databases.
References
- https://github.com/facebook/php-webdriver/wiki/Alert,-tabs,-frames,-iframes#frame-iframe
- https://github.com/laravel/dusk/blob/master/src/Concerns/InteractsWithJavascript.php#L13
- https://github.com/laravel/dusk/issues/558
- https://github.com/laravel/dusk/blob/master/src/Concerns/InteractsWithElements.php#L154
- https://laravel.com/docs/5.7/dusk#browser-macros
- https://medium.com/@phpTechnocrat/how-to-use-laravel-dusk-to-test-stripe-cashier-c27471c0383
- https://stackoverflow.com/questions/35542621/how-to-delete-the-logs-on-stripe-in-a-test-environment/44653616


